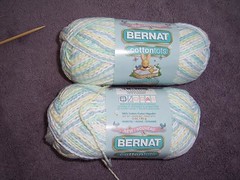
Yep, yesterday was my last day at work. My lovely coworkers surprised me with a gorgeous pottery bowl, plus 3 sets of needles and 3 skeins of yarn. The needles are Boye straights and the yarn is Bernat Disco, which is a novelty fur yarn but it's SPARKLY. I'm not sure what I'll do with it yet, but something. It was very nice of them.
I don't plan to be employed again until at least February.
Brendon has been sitting around the house playing video games on leave since last Monday, so he is completely in vacation mode already.
Today we're flying to California to spend 11 days at my parents' house. San Fran East Bay area. I will be taking my camera and the USB cord for it, so I will post, but not on a daily basis most likely, unless I can't adjust to the time change and have nothing better to do when I'm awake at 6 am every morning. I have a crochet project (okay, 2) to take on the plane. Crochet seems more airplane-friendly to me. Especially with a plastic hook.
Since it's Halloween, I suggested going in costume to the airport. You know, a turban for B, a burka for me, a black briefcase... B didn't think it was very funny. Somehow being in the military makes you lose your sense of humor concerning things like that. Oh well. The security people at the airport probably have that same gap in their sense of humor, so I guess it's for the best.
See you on the West Coast!
31 October 2006
30 October 2006
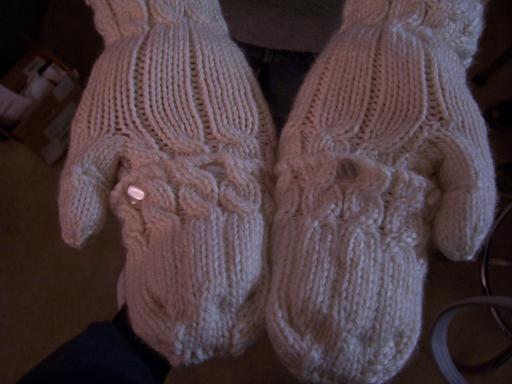
Fetching Convertible Mittens
I have finished my mom's Converted Convertible Fetching mittens - hooray! And a full 24 hours before I see her.
Back:

Palms:

Open:

For comparison, and because (somewhat unfortunately) I think they came out so much better, here are the original Converted Convertibles that I made for myself.

They're better only because the yarn is more appropriate for the pattern. They hold their shape better, you can actually see the cables, etc. Still, my mom's are like sliding your hands into a warm puffy cloud. So soft. So nice. Just not as pretty or stout. Also, the cream-colored ones have buttons so they actually stay closed and therefore toasty. The brown ones will have buttons too, but not yet. (Yes, though the picture quality suggests otherwise, these are the cream ones.)

If you want the pattern for the mods I made, I wrote it out in haste as I was going along, and I will attempt to transcribe it here in a more intelligible format, though it isn't really a standard-abbreviation type format. I won't promise that it actually works as written, but it should...
**This pattern is for the cream-colored version, since I don't really recommend using the brown yarn, or anything of its weight or other general characteristics, for future mitten-making. The feel of the Misti Alpaca is wonderful, but it would be better suited for something with less structure.**
First, follow the pattern for Fetching (which of course is copyrighted by Knitty), but do not work the thumbs. (I did a regular bind off, too, instead of the picot bind off, but you can go either way.)
Thumb:
Pick up the 17 sts as instructed in the original pattern.
Knit 7 rows.
Row 8:
(Left thumb) K 12, BO 5 sts
(Right thumb) K 7, BO 5 sts, K 5
Row 9:
(Left thumb) K 12, CO 5 sts - 17 sts total
(Right thumb) K7, CO 5 sts, K 5 - 17 sts total
Knit 7 rows.
Decreasing -
Row 1: 1st needle, K2tog 3 times, K 1; 2nd/3rd needle, K2tog 2 times, K 1.
Row 2: 1st needle, K2tog 2 times; 2nd/3rd needle, K2tog, K 1 - 2 sts per needle.
Cut yarn, thread tail through yarn needle and draw through all 6 loops, pull closed and weave in end.
Convertible Tops:
*Assuming there are 45 sts around your mitten in a 4x1 rib pattern*
Pick up 22 sts across back half of mitten, just above the last cable. CO 23 sts for front/palm of top flap and join to beginning. Sts should be divided across 4 dpns, with "Palm Side" on 2 needles and "Knuckle Side" on 2 needles.
Work 4 rows in 4x1 rib.
Work cable row as given in original pattern.
Work 5 rows in 4x1 rib.
Work cable row.
Work 12 rows in 4x1 rib.
Decreasing -
Row 1: Knuckle side - K 4, K2tog, K to last 6 sts, K2tog, K 4; Palm Side - K 4, K2tog, K to center, K2tog, K to last 6 sts, K2tog, K 4.
Row 2: Knuckle side - K 4, K2tog, K to last 6 sts, K2tog, K 4; Palm Side - Repeat Knuckle Side.
Row 3: Repeat row 2.
Row 4 & 5: Knuckle side - K 3, K2tog, K to last 5 sts, K2tog, K 3; Palm Side - Repeat Knuckle Side.
Row 6: Knuckle side - K 2, K2tog, K to last 4 sts, K2tog, K 2; Palm Side - Repeat.
Row 7: Knuckle side - K1, K2tog, K to last 3 sts, K2tog, K1; Palm Side - Repeat.
Cut yarn, thread tail through yarn needle, carefully turn mitten cap inside out. Run tail through sts, alternating between Knuckle and Palm Side sts for a straight seam across fingertips.
Attach buttons as desired to hold flap closed.
Back:

Palms:

Open:

For comparison, and because (somewhat unfortunately) I think they came out so much better, here are the original Converted Convertibles that I made for myself.

They're better only because the yarn is more appropriate for the pattern. They hold their shape better, you can actually see the cables, etc. Still, my mom's are like sliding your hands into a warm puffy cloud. So soft. So nice. Just not as pretty or stout. Also, the cream-colored ones have buttons so they actually stay closed and therefore toasty. The brown ones will have buttons too, but not yet. (Yes, though the picture quality suggests otherwise, these are the cream ones.)
If you want the pattern for the mods I made, I wrote it out in haste as I was going along, and I will attempt to transcribe it here in a more intelligible format, though it isn't really a standard-abbreviation type format. I won't promise that it actually works as written, but it should...
**This pattern is for the cream-colored version, since I don't really recommend using the brown yarn, or anything of its weight or other general characteristics, for future mitten-making. The feel of the Misti Alpaca is wonderful, but it would be better suited for something with less structure.**
* * * The Pattern * * *
First, follow the pattern for Fetching (which of course is copyrighted by Knitty), but do not work the thumbs. (I did a regular bind off, too, instead of the picot bind off, but you can go either way.)
Thumb:
Pick up the 17 sts as instructed in the original pattern.
Knit 7 rows.
Row 8:
(Left thumb) K 12, BO 5 sts
(Right thumb) K 7, BO 5 sts, K 5
Row 9:
(Left thumb) K 12, CO 5 sts - 17 sts total
(Right thumb) K7, CO 5 sts, K 5 - 17 sts total
Knit 7 rows.
Decreasing -
Row 1: 1st needle, K2tog 3 times, K 1; 2nd/3rd needle, K2tog 2 times, K 1.
Row 2: 1st needle, K2tog 2 times; 2nd/3rd needle, K2tog, K 1 - 2 sts per needle.
Cut yarn, thread tail through yarn needle and draw through all 6 loops, pull closed and weave in end.
Convertible Tops:
*Assuming there are 45 sts around your mitten in a 4x1 rib pattern*
Pick up 22 sts across back half of mitten, just above the last cable. CO 23 sts for front/palm of top flap and join to beginning. Sts should be divided across 4 dpns, with "Palm Side" on 2 needles and "Knuckle Side" on 2 needles.
Work 4 rows in 4x1 rib.
Work cable row as given in original pattern.
Work 5 rows in 4x1 rib.
Work cable row.
Work 12 rows in 4x1 rib.
Decreasing -
Row 1: Knuckle side - K 4, K2tog, K to last 6 sts, K2tog, K 4; Palm Side - K 4, K2tog, K to center, K2tog, K to last 6 sts, K2tog, K 4.
Row 2: Knuckle side - K 4, K2tog, K to last 6 sts, K2tog, K 4; Palm Side - Repeat Knuckle Side.
Row 3: Repeat row 2.
Row 4 & 5: Knuckle side - K 3, K2tog, K to last 5 sts, K2tog, K 3; Palm Side - Repeat Knuckle Side.
Row 6: Knuckle side - K 2, K2tog, K to last 4 sts, K2tog, K 2; Palm Side - Repeat.
Row 7: Knuckle side - K1, K2tog, K to last 3 sts, K2tog, K1; Palm Side - Repeat.
Cut yarn, thread tail through yarn needle, carefully turn mitten cap inside out. Run tail through sts, alternating between Knuckle and Palm Side sts for a straight seam across fingertips.
Attach buttons as desired to hold flap closed.
29 October 2006
Life After the Sweater's Completion
The Kimono Sweater is done, and yet the knitting goes on without missing a beat.
But before I even get started talking about new projects, I'd like to dive off into tangent-ness for a moment to talk about wearing hand-made items. I wore the new sweater to my gallery's opening Friday night. I always feel especially self-aware when I'm wearing things I've made, and particularly so when wearing them for the first time. I have a bunch of jewelry and a scarf or two, maybe a hat, etc, that I made so long ago that these things are now very much ingrained into my rotation of accessories, and these I wear now without a second thought (at least until somebody comments on them), but recently finished projects... I look down at the sleeve and relive every stitch; there's novelty in how the item drapes and feels and smells; I worry about what will happen if I get caught wearing it in the rain.
Only one person (my boss Nicole, who knows I knit) commented on the sweater Friday night to ask if I had made it myself, but I take that as a compliment - it looked nice enough to pass as storebought.
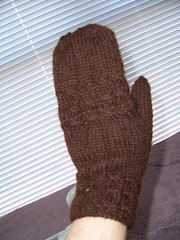
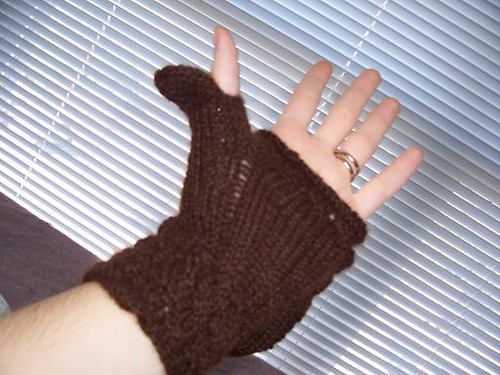
Anyhow, the world turns and I must move on into new endeavors. So... what's that brown lump over there? Hm?
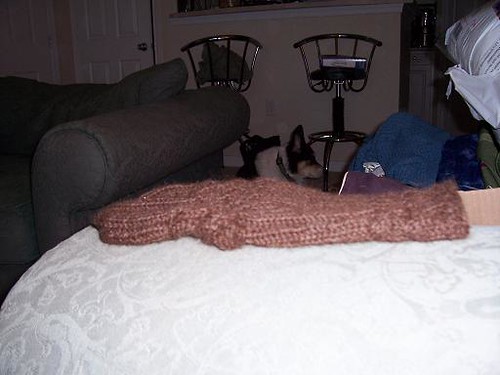 Why, it's a Fetching fingerless glove, turned into a convertible mitten!!
 Here's the top-up shot.

And here's the top down - back:
 ...and front.

But before I even get started talking about new projects, I'd like to dive off into tangent-ness for a moment to talk about wearing hand-made items. I wore the new sweater to my gallery's opening Friday night. I always feel especially self-aware when I'm wearing things I've made, and particularly so when wearing them for the first time. I have a bunch of jewelry and a scarf or two, maybe a hat, etc, that I made so long ago that these things are now very much ingrained into my rotation of accessories, and these I wear now without a second thought (at least until somebody comments on them), but recently finished projects... I look down at the sleeve and relive every stitch; there's novelty in how the item drapes and feels and smells; I worry about what will happen if I get caught wearing it in the rain.
Only one person (my boss Nicole, who knows I knit) commented on the sweater Friday night to ask if I had made it myself, but I take that as a compliment - it looked nice enough to pass as storebought.
Anyhow, the world turns and I must move on into new endeavors. So... what's that brown lump over there? Hm?
Why, it's a Fetching fingerless glove, turned into a convertible mitten!!Here's the top-up shot.And here's the top down - back:
...and front.These are for my mom, and hopefully they'll be done by the time I fly out to see her on Tuesday. Shouldn't be a problem, the first is finished and I'm making headway on the second. See? A whole cuff already.
They'll need buttons sewn on so that they hold closed a bit better, but I'll let her pick those out and I'll sew them on while I'm visiting.
The yarn is Misti Alpaca Sport, 100% baby alpaca, which I bought at Ewe Knits in Virginia Beach. Misti Alpaca's website says it's the "softest yarn ever" and that just may be true. It is not, however, the ideal yarn for this pattern. It's dark and fuzzy so it doesn't show off the cables or ribbing all that well, and it's a sport weight so I had to go and reconfigure the pattern for that, and the mitten is still a little, er, lacier than I wanted. Nonetheless, it is SOOO soft and putting it on my hand is a very pleasant experience. And it's very warm regardless of the slightly open stitches. Besides, my mom picked it out.
After that, I get into this stuff, but I'm not saying what it will be because it's a surprise for a friend.
27 October 2006
Kimono Styled Sweater
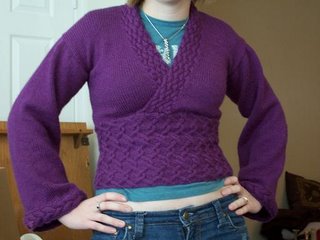
Here it is. Blocked, dry, and worn in public.
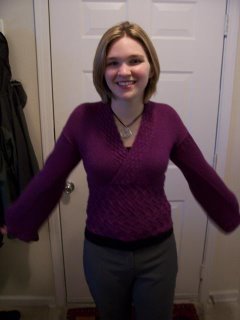
Pattern: Kimono Styled Sweater by KnitPicks
Yarn: KnitPicks Elegance (70% Baby Alpace/30% Silk) in Lilac
Time Consumed: 9/30 - 10/24 (plus 2 days of drying after blocking)
Notes:
There are a couple of errors in the pattern as written. For anyone attempting to work this sweater, my corrections are as follows~
1) In the "Fishernet Cable Pattern" the directions read "Rows 19-24: rep rows 1-6." This does not work. Instead I repeated rows 7-12, except on row 9 (aka 21) use a c4f instead of a c4b.
2) In the "Braided Cable Pattern" row 7 should be a "6-st Right Cable" instead of a "6-st Left Cable."
Other alterations I used included grafting the shoulder seams with kitchener stitch; using a provisional cast-on for the cuffs and then grafting those together; working the sleeves in the round instead of flat; and omitting the belt. I also recommend seaming the neckband on as you go instead of knitting the whole thing and then attaching it, guessing at the length.
Also I would like to mention that, while the sweater did expand slightly after blocking, it is still a little smaller than I would like it to be; you may want to make the size up from what the pattern tells you for your particular size.
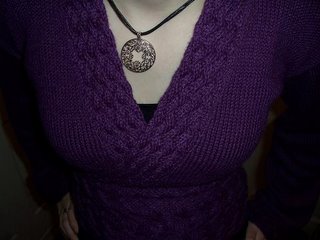 My husband finds it funny to take pictures of my chest.
25 October 2006
Kimono Sweater, Blocking
That's right. The Kimono Sweater is finished. A real live FO.
The knitting and seaming were finished last night around 11:30. With the neckband, I was seaming as I went along, so there wasn't much finishing to do. I wove in all my loose ends before leaving for work this morning. See me model the sweater:
 I have no head!!
The knitting and seaming were finished last night around 11:30. With the neckband, I was seaming as I went along, so there wasn't much finishing to do. I wove in all my loose ends before leaving for work this morning. See me model the sweater:
 I have no head!!
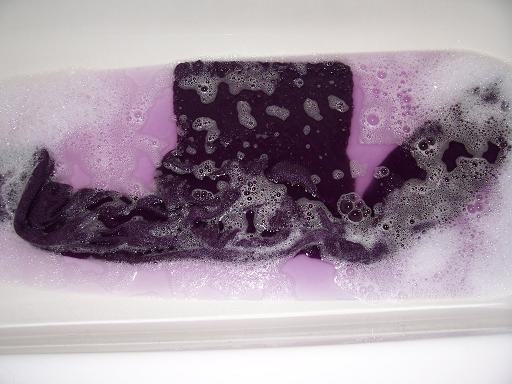
It's a bit tight, as you can tell. But from there, it's off to the blocking part, which should improve the smallness issue. This is the first time I've ever blocked anything (a lot of firsts on this project), so hopefully I did everything properly. First, the shampoo-ey soak in lukewarm water:
 Mmm, sudsy.
It was really quite surprising how much dye bled out in the water. Should I be worried about this? It doesn't look any worse for the wear afterward... Anyway, then the tub was drained and the sweater was rinsed:
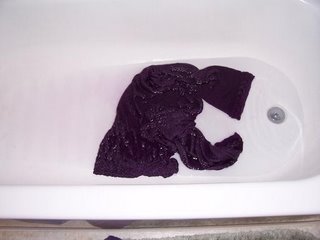 A lot less bleeding here, but still some. I ran the whole thing under the faucet for a while until there wan't a whole lot of purple pouring out any more. Then a quick wringing out, followed by the towel squeeze. I was happy to have some bright purple towels so that additional bleeding wouldn't ruin anything.
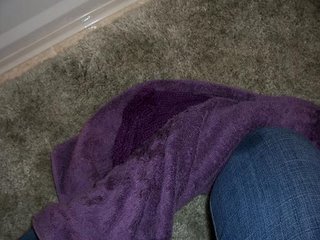 Check out the wet spot on my knee.
 Mmm, sudsy.
It was really quite surprising how much dye bled out in the water. Should I be worried about this? It doesn't look any worse for the wear afterward... Anyway, then the tub was drained and the sweater was rinsed:
 A lot less bleeding here, but still some. I ran the whole thing under the faucet for a while until there wan't a whole lot of purple pouring out any more. Then a quick wringing out, followed by the towel squeeze. I was happy to have some bright purple towels so that additional bleeding wouldn't ruin anything.
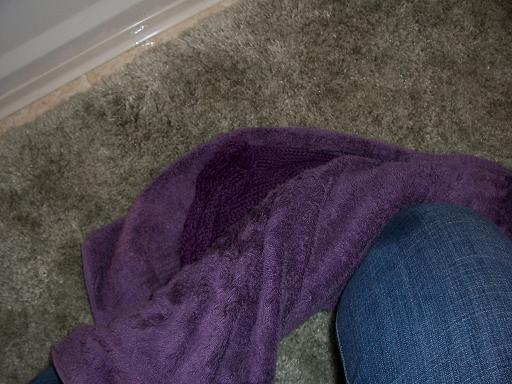 Check out the wet spot on my knee.
Finally I laid it out, where I stretched it and shaped it until, well, actually it still looks about the same. Maybe a little bigger. I am working on convincing myself that it looks bigger. It's hard to tell. I should have measured. Damn me.
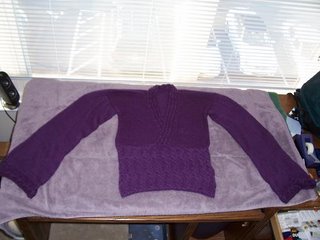 I'm not sure how long it'll be until it's dry. I don't think it's unreasonable to still expect to wear it Friday night for the opening reception. Right??
...Does it smell like wet llama in here to anybody else?
 I'm not sure how long it'll be until it's dry. I don't think it's unreasonable to still expect to wear it Friday night for the opening reception. Right??
...Does it smell like wet llama in here to anybody else?
Subscribe to:
Comments (Atom)