Back:

Palms:

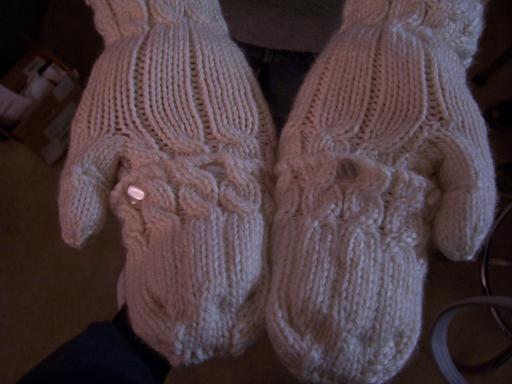
Open:

For comparison, and because (somewhat unfortunately) I think they came out so much better, here are the original Converted Convertibles that I made for myself.

They're better only because the yarn is more appropriate for the pattern. They hold their shape better, you can actually see the cables, etc. Still, my mom's are like sliding your hands into a warm puffy cloud. So soft. So nice. Just not as pretty or stout. Also, the cream-colored ones have buttons so they actually stay closed and therefore toasty. The brown ones will have buttons too, but not yet. (Yes, though the picture quality suggests otherwise, these are the cream ones.)
If you want the pattern for the mods I made, I wrote it out in haste as I was going along, and I will attempt to transcribe it here in a more intelligible format, though it isn't really a standard-abbreviation type format. I won't promise that it actually works as written, but it should...
**This pattern is for the cream-colored version, since I don't really recommend using the brown yarn, or anything of its weight or other general characteristics, for future mitten-making. The feel of the Misti Alpaca is wonderful, but it would be better suited for something with less structure.**
* * * The Pattern * * *
First, follow the pattern for Fetching (which of course is copyrighted by Knitty), but do not work the thumbs. (I did a regular bind off, too, instead of the picot bind off, but you can go either way.)
Thumb:
Pick up the 17 sts as instructed in the original pattern.
Knit 7 rows.
Row 8:
(Left thumb) K 12, BO 5 sts
(Right thumb) K 7, BO 5 sts, K 5
Row 9:
(Left thumb) K 12, CO 5 sts - 17 sts total
(Right thumb) K7, CO 5 sts, K 5 - 17 sts total
Knit 7 rows.
Decreasing -
Row 1: 1st needle, K2tog 3 times, K 1; 2nd/3rd needle, K2tog 2 times, K 1.
Row 2: 1st needle, K2tog 2 times; 2nd/3rd needle, K2tog, K 1 - 2 sts per needle.
Cut yarn, thread tail through yarn needle and draw through all 6 loops, pull closed and weave in end.
Convertible Tops:
*Assuming there are 45 sts around your mitten in a 4x1 rib pattern*
Pick up 22 sts across back half of mitten, just above the last cable. CO 23 sts for front/palm of top flap and join to beginning. Sts should be divided across 4 dpns, with "Palm Side" on 2 needles and "Knuckle Side" on 2 needles.
Work 4 rows in 4x1 rib.
Work cable row as given in original pattern.
Work 5 rows in 4x1 rib.
Work cable row.
Work 12 rows in 4x1 rib.
Decreasing -
Row 1: Knuckle side - K 4, K2tog, K to last 6 sts, K2tog, K 4; Palm Side - K 4, K2tog, K to center, K2tog, K to last 6 sts, K2tog, K 4.
Row 2: Knuckle side - K 4, K2tog, K to last 6 sts, K2tog, K 4; Palm Side - Repeat Knuckle Side.
Row 3: Repeat row 2.
Row 4 & 5: Knuckle side - K 3, K2tog, K to last 5 sts, K2tog, K 3; Palm Side - Repeat Knuckle Side.
Row 6: Knuckle side - K 2, K2tog, K to last 4 sts, K2tog, K 2; Palm Side - Repeat.
Row 7: Knuckle side - K1, K2tog, K to last 3 sts, K2tog, K1; Palm Side - Repeat.
Cut yarn, thread tail through yarn needle, carefully turn mitten cap inside out. Run tail through sts, alternating between Knuckle and Palm Side sts for a straight seam across fingertips.
Attach buttons as desired to hold flap closed.
2 comments:
That's just brilliant!
You did an excellent job on these and I love them. I am going to make a pair and I will share a photo when I am done.
Thanks for sharing!
Post a Comment